Tuesday, June 10, 2014

Lost Wax Casting

I took a most awesome class at PetersValley this last week: lost wax casting for jewelry.  I took it because I wanted to make knife parts, and it was fantastic!  It was taught by Paul Nielsen, and the studio manager/artist in residence was Kristal Romano.
The basic idea is that you make something in wax and embed it in a plaster mold:
This is a wax butt cap for a knife set up on a base for casting.  The metal cylinder behind it will go over the top and the whole thing gets filled with plaster.  The wax gets melted out, and hot metal is poured in.  Let the metal cool, break away the plaster, and you get these:
The metal version of the wax from in the first picture the second one back.

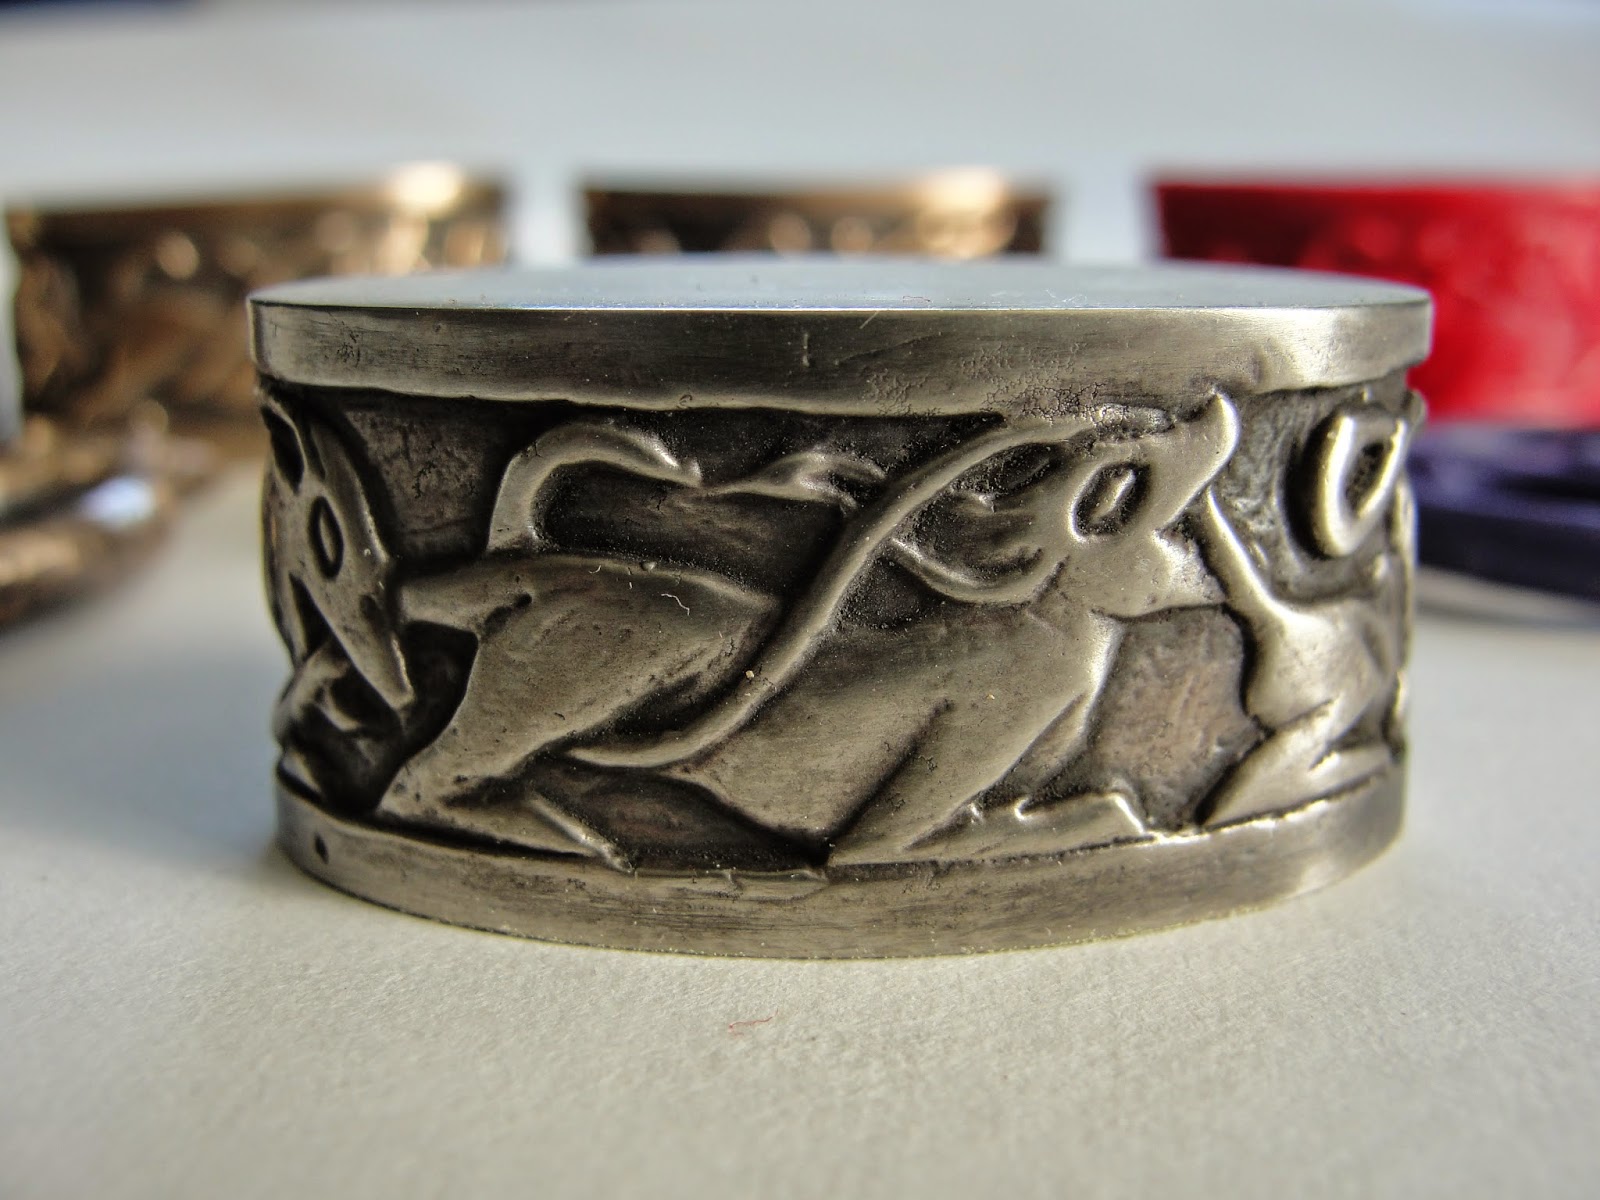
Once you clean these rough castings up, you end up with something like this:

And even better, if you make a rubber mold of the original first, you can make multiple wax copies, and thus multiple metal copies:
A couple of the wax copies are on the right.  The ones on the left are white bronze, and the ones in the middle are classic bronze.  So sometime in the next couple months I should get some knives done with fancy cast guards!

Tuesday, May 13, 2014

Sgain-Dubh

I just finished my first sgian-dubh.  A sgian-dubh is the little knife Scotsmen carry in their sock.  It's going to an old friend who is (or at least used to be) a piper.  I made sure I played bagpipe music while making it.
The blade is 1084, the handle is African blackwood I carved into a spiral, and the fittings are nickel silver with my primitive attempt at engraving them.
The spine has a tapering vine pattern carved into it, and the sheath is designed to go in a sock, of course.  The whole knife is only 8" long, split evenly between handle and blade.

Friday, May 9, 2014

First Chef's Knife

I took the plunge and tried my first chef's knife.  I think chef's knives are some of the hardest knives to make correctly because they need to be so thin.  It makes forging, heat treat, and grinding that much harder - you've got almost zero room for mistakes.
It's made from 1084 with brass bolsters and pins, and the handle is caramelized stabilized maple from a tree I cut.  The blade is 8", and despite my best efforts it's a little too thick (d'oh!).  I ground the edge down to 0.5mm before sharpening, but it really needed to be more like 0.3mm.  The pine is about 2.8mm in the middle, but again it needed to be more like 2 mm (or less).  As small as these differences are, they make a big difference in the performance of the knife.  We've been using it for a week now in the kitchen, and it tends to get stuck cutting raw sweet potatoes and other root vegetables.  This leads to pushing a bit harder, which is what leads to accidents.  It's great for meat and it chopped peppers  & onions last night with no effort.  But as a professional chef friend who played with it said "it's not for fine work."

So, not a failure, but not really what I wanted.  The next attempt will be a 6" chef from O-1 tool steel.  O-1 has a much longer window for getting it into the quench from the kiln, so super thin blades are easier to heat treat because you don't have to worry nearly as much  about heat loss.


Thursday, May 1, 2014

Beautiful Failure

Learning often hurts.  I learned a lot with this blade, and it was incredibly painful.
This seax was going to be a beauty.  19" long blade out of 1075.  I'd cut two fullers down each side.  The tapers were not quite what I wanted but were in the acceptable range.  I had a nice handle planned for it.  Then the trouble began...
After heat treat the blade still  had a little more up-sweep than I wanted.  Single edge blades curl downward when quenched in oil, up when quenched in water.  Katanas are forged straight and only get their characteristic curve when quenched in water.  I had forged this blade with a bit of a curve upwards, knowing it would curl down a bit.
The bigger problem was that it wasn't  uniformly hard on the edge.  Some spots were nice and hard, others were quite soft.  So I decided to heat treat again.  The blade curled down to exactly where I wanted it (the shape in the photo), but again it had weird splotchy hardening that didn't really make sense.  Back into the heat treat oven.
I let it soak for 7 minutes at temp this time, even though 1075 doesn't need it.  My theory was that was such a big mass of steel it wasn't completely getting up to temp.  Wrong - same result.  And now the blade had a slight downward curve-ok, but not ideal.  So one more time.  This time upped the temp 50 degrees and soaked again.  The results were better, but still not ideal.  And now it was definitively curved down.  I pondered...
My next theory was that the problem was me.  Simple carbon steel needs to go from it's critical temperature to below 900 degrees in less than a second.  Because this blade was so big, I think I was simply missing the window because it took me a second or more to get it our of the kiln and into the oil.  Because I was missing the window, pearlite (a softer form of steel) was starting to form in spots.  This would explain the splotchy pattern of hardness, which was very different from what I'd see if the blade were inadequately heated.  It didn't help that I was using McMaster-Carr Fastquench oil, which is an 11 second oil.  Simple carbon steel would harden better in a faster oil (5-6 second) or water.
With the ugly downward curve, and the questionable hardness, I decided I couldn't leave the blade as it was.  Besides, I needed to know!  So I rolled the dice and did a final heat treat.  I heated it to 1550 (50 over normal) set up so I could move from the kiln to the quench as fast as possible, and used 120 degree brine as a quench.  Brine is dangerous because it's so fast a quenchant it can crack blades.  But it's virtue is speed, and being mostly water it would cause the blade to curl upwards.  This would solve both my problems at the same time.
The result?  The picture above is the result.  Edge hardness was decent (I'm still not fast enough), and the blade curled upward to exactly where i had wanted it, but...
This is what makes bladesmiths cry.  I heard the ping of failure about a second and a half into the quench.  I actually heard 3 pings - each a big crack.

So, as painful as it was I learned a few things:
1)  I'm too slow with blades over 12" or so to use simple steels with my current setup.
2)  MC Fastquech is borderline too slow for simple steels.
3)  I hate water & brine as quenchants (kinda knew that already).

The orders went out a couple days ago for some 80CRV2 steel and Parks 50 quenchant.  Hopefully I'll be posting happy picture of a blade similar to this in a couple months (life gets in the way of smithing).

Friday, April 18, 2014

Curved Hunter

Finished a hunting knife this week:

I made it in the process of showing my apprentice Otto how to make a knife.  The blade is 4.5" long and it's 9.5" overall.  It's made from 3/16ths 1084.  I had two main goals for the knife (besides showing Otto what to do):
First, I wanted to explore the handle shape.  The downward curve and the two partial circles leading up to the blade are what makes the shape interesting to me.  It makes it comfortable to hold and gives two distinct hand positions for holding it.  Having the index finger in the partial circle closest to the edge and your thumb on the back of the blade gives great control for small cuts.

Second, I wanted to test out the pin press I built.  It's basically a 12 ton hydraulic jack in a square frame with two dies that down to 1/4" circles.  The bolster on this knife was soldered into place, then I drilled a 1/8" hole through the center of it, tapered both sides with a pin reamer, put a brass pin in the whole, and crushed it with the pin press so it filled out the hole.  You could do this with a hammer, but the pin press has so much more force that the seams between the pin and the bolster become invisible.  It's pretty awesome.
I also got my seams around the handle much closer to perfect on this knife than the last full tang I did.  Still not perfect, but you have to look really closely to see the gaps.
The wood on the handle is caramelized, stabilized maple burls from my brother's wood pile, again.  It's amazing how much great handle material is in people's wood piles when you start looking for it.  I'm also very happy that I invested in a stabilizing set-up.  It cost a few hundred to set up and the acrylic is $100 a gallon, but stabilized wood runs $30-$40 for a single handle so the payback point comes up really fast (10 knives).  I get about 50 handles per gallon of acrylic.

I plan to evolve this design some more.  I want to do it again with a smaller clip in the blade so there is more room for your thumb, and I want to do file work on the back for better grip.

Saturday, March 15, 2014

Size Matters

My brother came over today and saw Viveka's War Knife in person for the first time.  "Holy sh!t it's huge!'  was his reaction.  So I thought I'd post this pic for a sense of scale.  I'm just a bit under 6' tall:
It's a BFK (Big F'ing Knife). Almost a Swedish wakazashi...

Thursday, March 13, 2014

Viveka's War Knife

I once knew a woman of Scandinavian descent named Viveka.  She was long and lean, strong and sharp.  This knife makes me think of her, and so I named it for her.
(And yes, I do find it kind of pretentious to name a knife.  But then I ran into the problem of referring to individuals knives "You know, the big one with the carving of the dragons on the handle?...  No, not that one, the one I made after that."  Plus listing them on Etsy in a way people might remember is tough--"Seax #12"-- so I bowed to practicality and started naming them.)

Viveka's War Knife is a type of seax called a Baltic war knife because they are found all along the coast of the Baltic sea, and the assumption is that they were used for fighting, among other things.  I started out trying to stay closer to the originals that the Dog Seax I made last year.  The blade is 15" long and 1.25" wide (381 mm by 32 mm).  The spine is just under a quarter inch (15/64th or 5.8mm) at the handle and has a very slight distal taper out the where the point begins where it is 11/64ths (4.4mm).  It's made out of my usual 1084 carbon steel, hand finished to 600 grit.  The bevels are sloped so that before sharpening the edge was .5 -.6mm wide.  I'm going to have to do some experiments with it to see how such a radical change in width affects it's ability to cut.
The original handle i had planned was fairly simple, with the only carving on a small bone inlay.  But then I decided not to do that for technical reasons, and started carving.  The handle is cherry, and the carving is a mirror image on each side.  It's a composite pattern off of two viking animal brooches.  The spacers are brass and the white section front and rear are cow bone.  The runes...  well, I kinda f'ed them up.  Don't ask.  They are burned into the bone using a wood burner (something I wouldn't do again).  The handle is 7" long, so the whole thing is 22" overall without the ring.
The sheath took it's queues from the handle, and so ended up being a long project. It's 8-10 tooling leather with brass fitting I cut & stamped by hand.  The pattern along the blade section comes off of a sword hilt that is in a museum in Finland.  The pattern on the handle section is something I made up, but it's just variation of a very standard Norse/Celtic animal pattern.
While I like this knife a lot, I have to do a simpler knife next.  All those patterns & little metal bits take a lot of patience and make you a bit loopy after a while.  I'll probably try this blade again with a simple wooden handle and a plain sheath.  But first I have a sgain-dubh to do, which at 3" should be a nice change of scale.