Tuesday, June 16, 2020

Trondheim Berserker

Been a long time since I posted.  I think I was suffering from internet fatigue.
This is my latest work:

It's a viking sword based of this original discovered in Trondheim, Norway.
The size and shape of the fittings are as close to the original as I can get based off of photos and measurements from the museum.  Mine differs in that I used cast bronze fittings inlaid with silver, whereas the original is silver either inlaid or overlaid on iron using a slightly different technique.  As a result my lines aren't quite as thin as the original, and I used less dots.
The handle is pure speculation.  It's carved caribou antler with a design derived from the one on  the fittings.  There are examples of original handles made from antler, so the material and general shape are close  to originals.

 The pommel decorations appear to be two bears heads, which is why I call it the Trondheim Berserker.  "Berserker" means "bear skin", and I suspect the bears heads were meant to help bring the spirit of the bear to the warrior wielding the original
 The fittings are inlaid on all sides.


The hilt is actually hollow on this sword.  The walls are about 1/8"+ thick.  This gives plenty of depth for inlay and plenty of strength to protect the hand, but lightens the piece by about 100g.  That may not seem like a lot, but swords are like sports cars - any little bit of weight you can save without sacrificing performance is worth it.  The whole sword weighs 1264g / 2.78lbs.

The blade is 77.3cm / 30.43" long.  The core is made from high carbon cable surrounded by 24 layers of 1075 and 15N20.  The core is then worked into the serpent pattern.

 This blade was one of two I made this winter to experiment with the serpent pattern in cable.  This one has a ground in fuller so I could see what the cable pattern looked like as you cut toward the center.
 The core was tapered at the tip with a fishmouth weld, and then the edge bar wraps completely around the whole sword.  The edge bar is about 500 layers of 1075 and 15N20.
The scabbard is thin wooden slats lined with 100% merino wool felt.  That core is then wrapped with 3oz  grade A tooling leather from Wickett & Craig.

The designs embossed into the sheath are of the Gosforth Cross, which has always amused me because it's a christian cross covered with pictures of the norse gods. 

The chape is based on an original found in Russia.  I altered the proportions slightly to fit this scabbard.  It's cast in .925 sterling silver.
The scabbard slide is done the way many originals were made.  It is a wooden slide directly attached to the sheath cover and then covered over by the leather.  This provides a very firm anchor for the straps.


Thursday, August 22, 2019

What I did this last year: Part 1 - Babayaga's Warknife

I realized the other day I haven't posted anything in a year.  Partly it's internet fatigue, and partly it's being busy.  I've also found I like Instagram (hopkins_forge) the best for sharing my work as it's quick and easy.  But occasionally I do like a longer, more thoughtful format...
What have I been doing for a year?
I finally finished a long term side project - Babayaga's Warknife
It's what I would call historically-based fantasy, or maybe a history-based extrapolation.  I started with the basic form of baltic warknives, pulled in a few historical patterns and shapes, and then swirled it all together with whatever came out of my fevered brain.
The result is a 22" blade, 32" overall.  This may seem awfully big for a knife, but it falls easily within the size range of authentic seaxes.

The handle is bog oak with a moose antler spacer in the middle.  I'll never carve bog oak again - it has the terrible combination of being both chippy and soft at the same time.  The fittings are bronze and there are 3 silver medallions inlaid in the handle.

My inspiration for the piece evolved out of reading the Mongoliad series of books (various authors).  It's the kind of weapon I imagined a volva (like Babayaga) might carry.  Not a weapon meant for battling armored opponents, but something for self-defense in a time/world where everyone carries a knife of some sort.  I think of it as a Rus wakizashi.

I did more than this in a year, but I think I'll split it into a series of posts.

Thursday, August 9, 2018

More knives...

I'm considering testing for Journeyman Smith with the American Bladesmith Society.  My work doesn't really fit within the mainstream of the work they like/propagate/whatever, but I think that passing trying to pass the test will make me a better smith, and give me an objective judgment on the quality of my work.  We often think we're unbiased and rational judges of the world and our own work, but often that turns out to be wrong.  So I figured I better take a run at Journeyman.

First step is this 5" skinner for a friend:
I'm unsure how it will work as a skinner, but that's the nice thing about making knives for friends - you get real feedback.  It's forged from 1084 with brass fittings and a stabilized cherry burl handle.  The main point of this knife from the test perspective is fit and finish.
As you can see here I got the fit of the bolsters to the handle to the blade almost perfect.  It could be a touch better, but I think it teeters on the edge of passing from what I've seen.  As a side note, I won't be using brass on my test knives.  The phrase "Brass is crass" has wafted by my ears in discussions about the test.

This second knife is nothing I'd ever submit for the test, but it posed a really good challenge for fit and finish.

It's a bowie with an 11" blade made from 80CRV2, which is a very tough steel.  The blade is flat ground with a spine that is 1/4" thick.   Overall length is 17".

The fittings are cast bronze, and the handle is stabilized cherry burl.


I like doing filework so I couldn't resist such a long and wide spine - I ran a vine pattern down it

 
That's about it for now.


Tuesday, June 5, 2018

Type Z Viking Sword

I finally finished my first viking sword that I made all-by-myself.  The big challenge on this one is that wide shallow fuller - I've never done that before and it looks difficult to get right.
Here's the sword blank (1075 steel) with the bevels forged in.  I shaped the initial blank with the power hammer, and then hand forged the tip and the bevels.

I didn't take a picture, but the bevels are forged in with a spring tool whose dies are radiused to 6".  Here's the result:
Slightly crooked, but it gets a lot of the steel to the right areas and significantly widened the blade.  It also made it about an inch longer.

One of the biggest challenges on any sword is getting it straight in all dimensions.  Here's how I start to establish a straight edge - marking fluid and a scribed straight line down the edge.  It will move during the hardening process, but it's much easier to get back to straight when that's where you started.

The fuller being straight struck me as the biggest challenge of the blade, so I made this contraption to grind the fuller straight.
It's essentially a really big work rest (with legs) and a sled to hold the blade level as I move it.  It worked very well for the rough grinding of the fuller.  It got it nice and straight.  After that all the grinding was done by hand.  Not ruining the nice straight fuller is much easier (but not easy) than trying to establish one by hand.

The finished blade was pretty much straight.  The sides if the fuller area bit wobbly because that line can't directly be made straight - it's created by the interplay of the fuller and the bevels and is affected by the thickness of both.  All you can do is make both as straight in all dimensions as possible and then do some cheat grinding where you didn't get it quite right.

The guards and pommel are carved from wax.  I modeled them after an original that I think is in the Swedish National Museum (but I could be wrong).

I get the overall shape completed and fit them to the blade before I start decorative carving.  That way if I blow some fundamental dimension or the fit, I haven't ruined lots of hours of carving.

And skipping over a whole lotta work, here's the finished product.

The blade is 28" (711mm) long and the sword is 34" (863mm) overall.  It weigh 2lbs 13oz (1146g).
The handle is stabilized cherry burl, and the fittings are all bronze (90% Cu, 10% Sn)

I'm fairly happy with it.  I'm going to make the next blade a touch thinner as this one has a little more forward weight than I personally like.  But then again another smith who held it said it was the first sword he really like because of that slight forward weight.  It does let you know exactly what it's for - cleaving.


Monday, May 14, 2018

Longsword #1

I had the opportunity to take a sword class with Peter Johnsson last year, and it was truly excellent.  This sword is the result of that class, though it took me almost a year to do the final details and get a scabbard on it.
It's a 15th century longsword, or hand-and-a-half sword if you prefer that term.  In Oakeshott's sword typology it's a type XVIIIb.  The blade is 37.75" long, and the overall length is 47.75".  Somewhat surprisingly it weighs only 3lbs 0.6oz (1378 grams).  The blade is made from 1084 carbon steel, the fitting are 1050 carbon steel, and the handle is fruit wood wrapped in twine and leather.

Thanks to Peter's guidance the handling is amazing.  "It floats in my hand" is probably the best thing someone said when handling it, with "It goes where I want it to" coming in a close second.  For those of you who are interested in such things, the point of balance is 3.5" down the blade.  The hilt node of vibration is almost exactly in the center of the forward part of the handle.  The blade node of vibration is 22.5" down the blade.  The forward pivot point is at 33.75" down the blade (4" from the tip).  The aft pivot point is about 21" down the blade.

What all these measurements mean is that when you hold the sword in one hand it is very good for thrusting.  The tip stays on target as you move the  handle from side to side.  Grip the sword with two hands and the rotational dynamics change.  It will now tend to pivot around the sweet spot for cutting (the forward node of rotation), making it a fast and effective cutter.

I'm excited enough about how it came out that I'm definitely going to make another one.  Or two.

Monday, March 5, 2018

Fingrbitr

Some pieces you start and work until they are done.  Other pieces have a more rambling and haphazard path. Fingrbitr is one of those.
Fingrbitr ("Finger Biter" in english) started out with Emiliano Carrillo and I sitting around talking about the new blade he'd forged.  He wasn't sure what he was going to do with it, and I mentioned that I had a set of type Z fittings I'd been carving for the last few months as a side project.   Then we realized the Ashoken Bladesmithing conference was in two weeks, and decided we'd combine our projects and try to get it done for Ashoken.
If you want to see the details of how we made the sword, we posted a thread on Bladesmiths Forum.  We got it done just in time and took it to the conference in a deluxe cardboard and duct tape scabbard.
Afterwards the sword went home with Emiliano to get a real scabbard.  That took a few months - life gets in the way of swordsmithing...
Once the scabbard was done it eventually made its way to my house, where it spent another few months while I worked on the design for the chape and locket, and then carved and cast them.  So 6 months after we combined our projects, we finally got this one done.

The Details:  The blade is made of three twisted bars of 1084 and 15n20 with an edge wrap of 800 layers of the same materials. It weighs in at about a pound and a half. The blade is 30 3/4 inches long and has a fuller running almost its entire length on both sides. 
The sword weighs 2lbs 13oz / 1273g.  It's 37" overall.
The point of balance is 6" from the hilt.
The pivot point about 20" from the hilt (hard to figure it out exactly by yourself).  The center of percussion is 21" from the hilt.  Having these two points in almost the same spot and that spot being approximately 2/3rds of the way up the blade means that the sword will handle well and hit hard at the sweet spot.
Fingrbitr got its name because of all the times Emiliano and I cut ourselves while making it.  Emiliano brought the edges down to sharp while finishing the blade (so there is no sharpening bevel) and it ended up with that aggressive cut-you-just-for-touching-me kind of sharp.
At the time of this post Fingrbitr is available for purchase.  You can email me if you are interested in it.


Thursday, January 4, 2018

A Seaxy Threesome

Hard to know where all the time goes.  I think I have a lot of time to get things done, but now Fall is long over and I only got half of what I wanted done.  I did finish 3 seaxes this Fall,

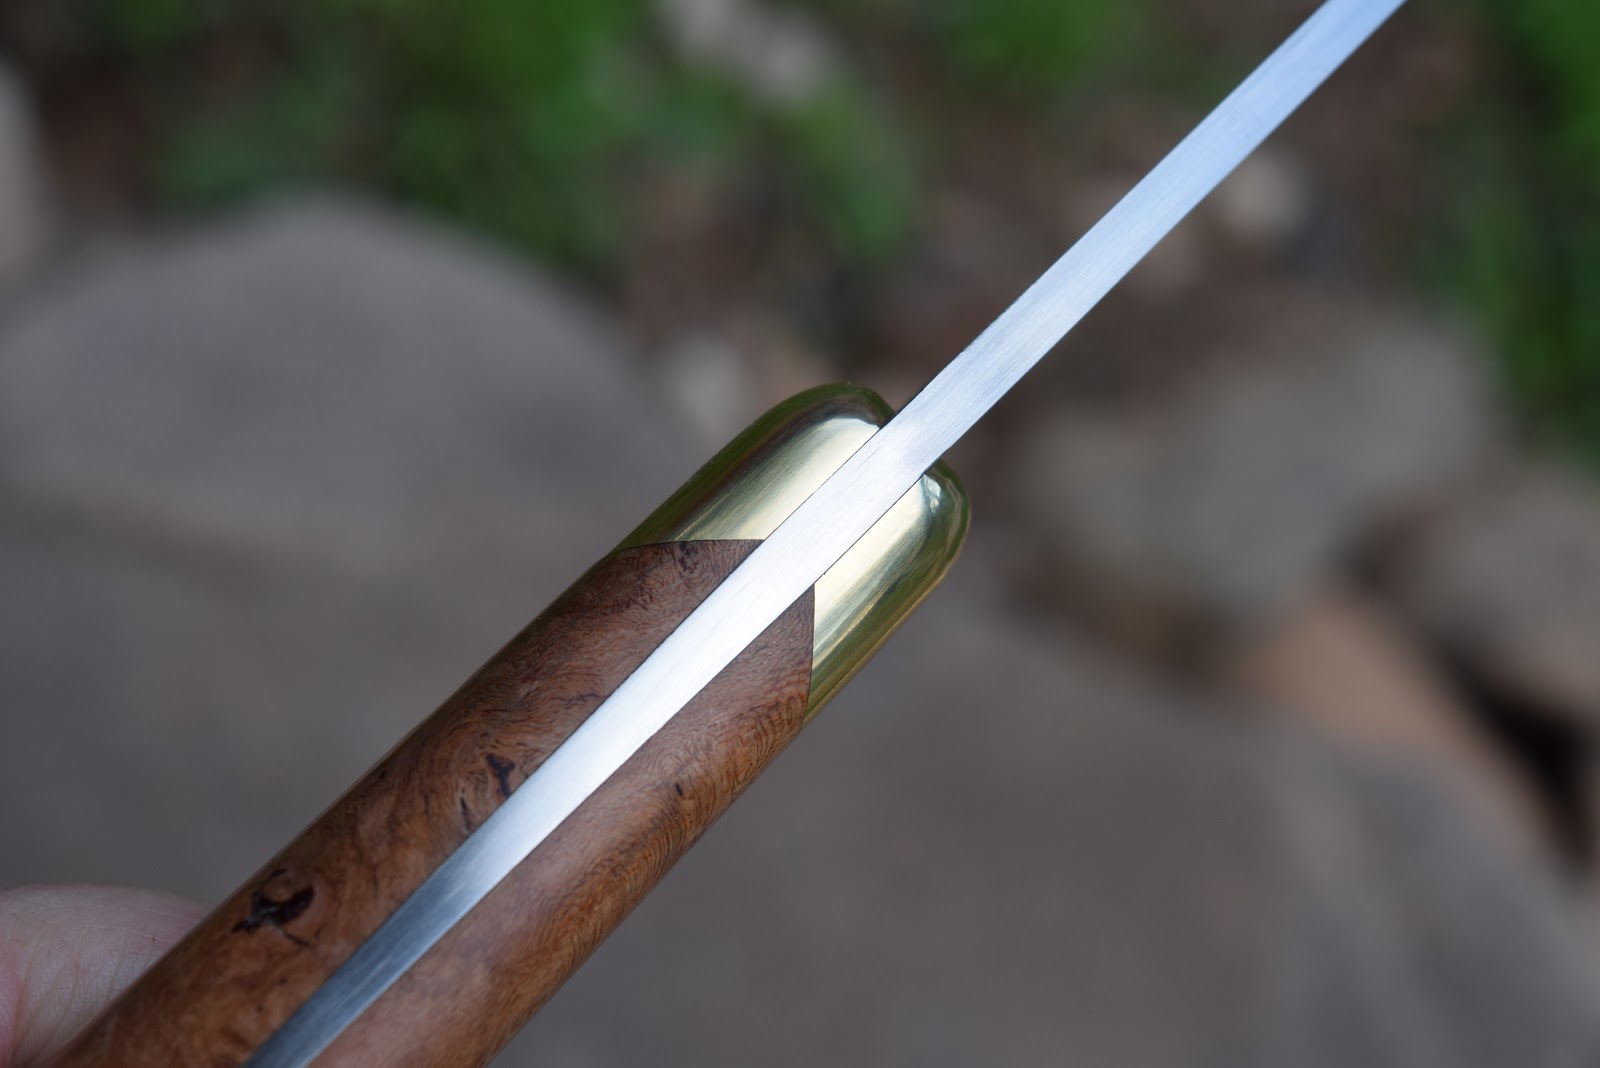
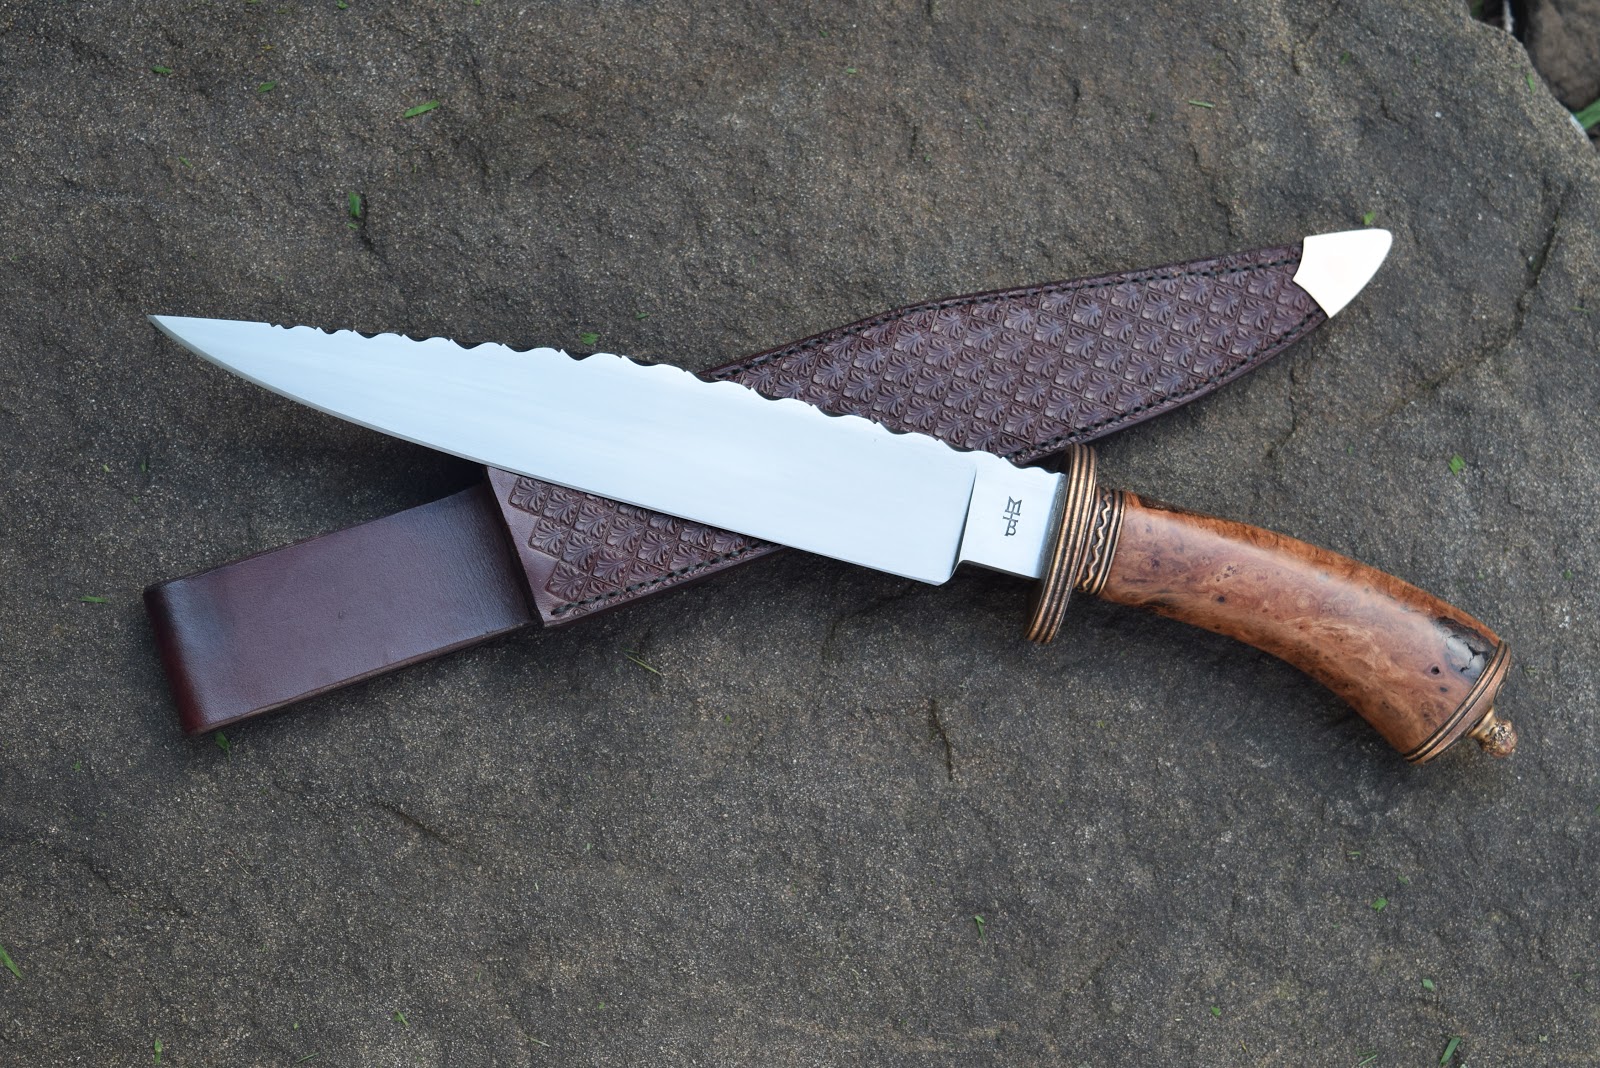
This first one a classic Baltic area viking age knife. The blade is 6.25" (15.8cm), and the overall length is 11.5" (29cm). 

The blade is a multibar pattern-weld (damascus) from 3 bars.  The edge is 423 layers of 1095 & 15N20 steel in a pool & eye pattern.  The middle bar is a loose twist of these same two steels, and the the spine is old wrought iron from my mom's 1815 farm.
The handle is caribou antler left natural, and two unique bronze fittings shaped to the antler.  The sheath is top grain tooling leather with bronze fittings stamped with geometric decorations.  I've tried for a slightly weathered look on the whole piece.


The second seax is a bit bigger.  The blade is 10.5" long.  Overall length of the seax is 17".  The blade shape owes a bit to the leuku of the sami people, but definitely falls within the range of blade shapes produced in scandinavia during the viking age.   The blade is made from the same billet of damascus as the first blade.

The handle is torrified maple (torrified wood has been heated in a non-oxygen atmosphere to induce chemical changes that make it resistant to moisture) with 4 coats of waterlox varnish.  It has a Urnes style dragon carved on both sides.  The fittings are hand cast bronze.


The sheath is done in a baltic style.  The handle section of the sheath has been lined with merino wool felt for a nice secure fit to the seax. The fittings are hand stamped 20ga. bronze sheet, and the suspension rings are cast bronze.


Ironically I was trying to make simpler seaxes with less decoration so they would be less expensive.  I did ok on the first one, kinda blew it on the second one by adding the handle carvings.  On this one I just gave up and did what I felt like doing. :-\

This seax is made in an Anglo-Saxon style appropriate to about 600 AD to 1100 AD.  I tried to keep it within bounds for a historical piece, but it is not a reproduction of any particular seax.

The blade is 14" long.  It is a triple bar pattern-weld using the same configuration as the other two, but the twist in the middle bar is a bit tighter on this blade.  Overall length is  is 21" (533mm) and weighs 1 lb.  4.59 oz.

The handle is made from stabilized maple, which is maple saturated with acrylic resin.  While certainly not historical, it provides a harder handle that will withstand much more abuse, and will have negligible swelling and shrinkage due to humidity changes.  As a bonus, the stabilizing is invisible so no one will ever know if you don't tell them.

The handle is carved on both sides with a dragon that has a garnet set into the handle for it's eye.  The handle also has two coats of Waterlox varnish applied to it to seal any tiny imperfections and further weatherproof the handle.  The fittings are bronze, made from carvings of mine using the lost wax casting process.

I also managed to make some jewelry, but that's for another post.